
Photon SSTV
Photon SSTV for iPhone and iPad · User manual · Version 0.1
Photon SSTV receives and sends slow-scan television (SSTV): still pictures sent as sound over radio. It decodes pictures live from your radio, shows the signal on a waterfall, keeps a gallery, sends pictures with your callsign, and helps you receive the International Space Station's SSTV events: pass predictions, Doppler memories for your radio, a pointing tracker, and practice passes.
1. Quick start
See it work in ten seconds
- Open the Receive tab.
- Tap PLAY SAMPLE on the line under the picture.
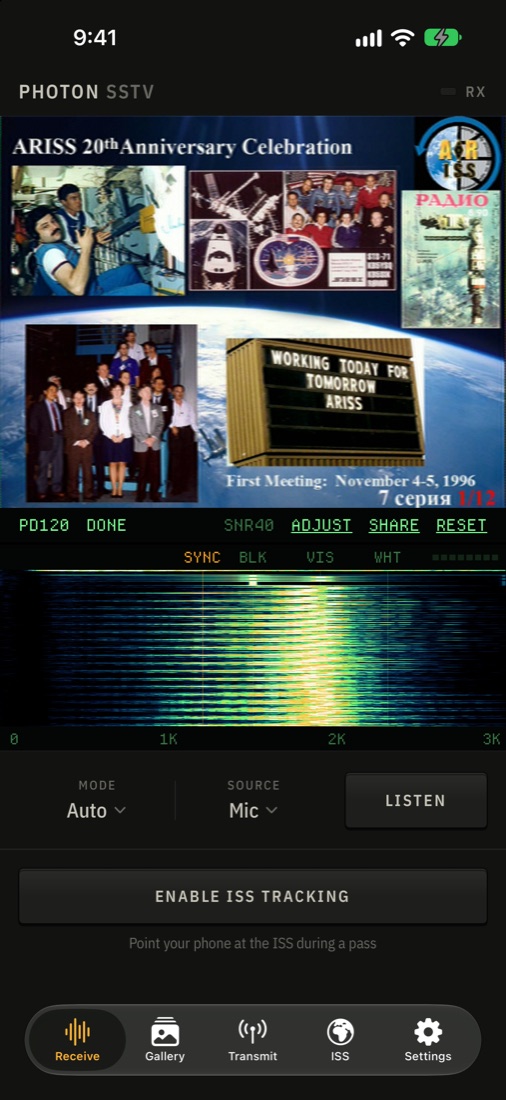
Photon SSTV plays a real recording of the ISS sending a picture (PD120, from the ARISS 20th-anniversary series) into its decoder. You'll see the picture paint from the top, line by line, while the signal scrolls down the waterfall. It plays at 4× speed; change that under Source → File speed.
Receive from your radio
- Tune your radio to an SSTV signal: during an ISS event, 437.550 MHz FM (check the event page); on HF, 14.230 MHz USB is the busiest SSTV frequency.
- Get the radio's audio to the phone: hold the phone near the speaker, or connect a cable interface, a Bluetooth radio, or SDR software (see Connecting your radio).
- Tap Listen. Photon SSTV recognises the picture's mode by itself and starts painting.
Before your first ISS pass
- Set your location: Settings → ISS → Grid square, or Use my location on the ISS tab.
- Program the Doppler memories into your radio (section 9).
- Try a practice pass.
2. The Receive screen
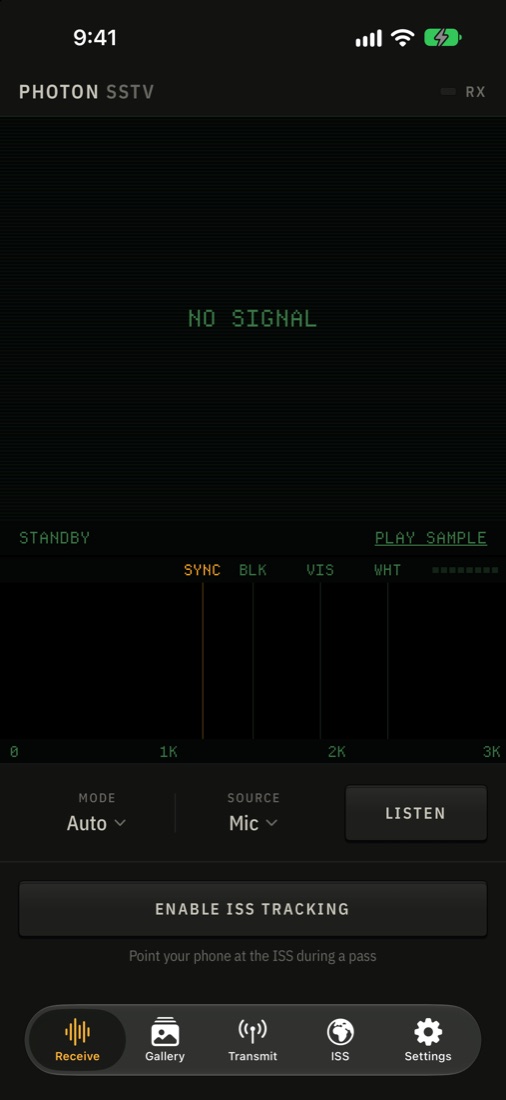
The screen is laid out like a piece of radio gear: a display across the top with readouts written on it, and a few controls below.
- Picture
- Paints line by line as it arrives, with a bright scan line. When idle it shows NO SIGNAL (with the odd flicker of static), or LISTENING_ while listening.
- Status line
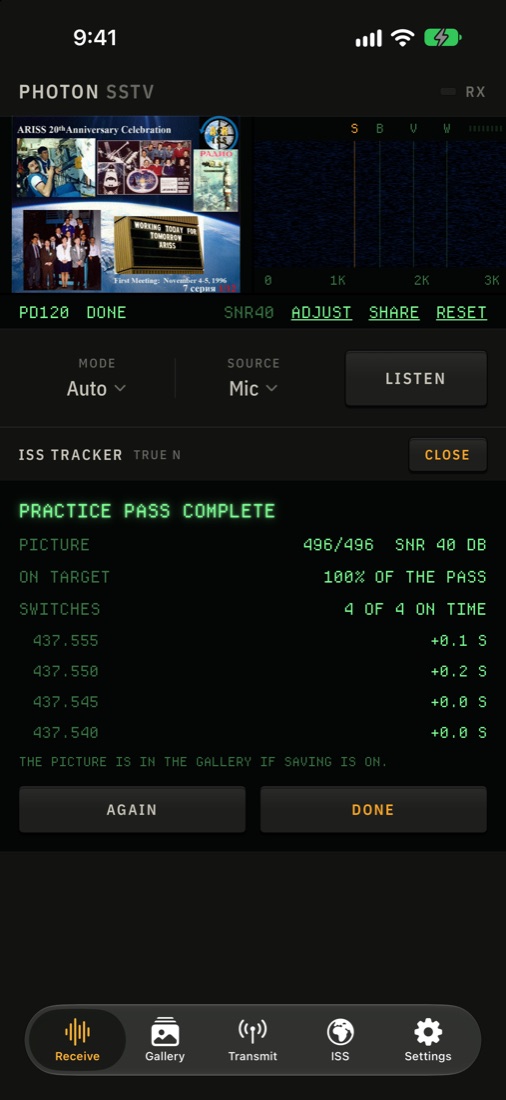
- The mode (for example PD120) and progress (312/496, then DONE). While a picture comes in, the tuning offset in Hz. When it's finished:
- SNR40: the estimated signal-to-noise ratio in dB. Above about 20 is a clean picture; below 10 is noisy.
- ADJUST: straighten or shift the picture (section 4).
- SHARE: send it to Photos, Messages, Mail and so on.
- RESET: clear the picture and the waterfall. While a picture is still coming in, RESET also stops listening and drops it.
- RX lamp
- Top right. It lights amber while a picture is being received.
- Waterfall
- The audio spectrum from 0 to 3 kHz, newest at the top. The marker lines show where SSTV's tones belong: SYNC 1200 Hz, BLK black 1500 Hz, VIS header 1900 Hz, WHT white 2300 Hz. A good signal fills the band between BLK and WHT, with a line at SYNC. The small meter at top right shows the input level. The colours and brightness are in Settings.
- Mode
- Auto (VIS) is best: each transmission starts with a short header (VIS) that names the mode, and Photon SSTV also spots pictures without one after about 16 lines. Choosing a mode forces it, which helps when you join a picture part-way through.
- Source
- Where the audio comes from:
- The microphone or a connected interface: built-in, USB or Bluetooth.
- Network audio from SDR software.
- Decode an audio file…
- Sample: ISS, PD120.
- File speed for recordings: real time, 4× or 16×.
- Listen / Stop
- Starts and stops receiving from the chosen source.
iPad: in landscape the picture fills the left and the controls sit on the right. With a keyboard: Space listens or stops, ⌘O opens a recording, Esc resets.
3. Connecting your radio
Through the air
The simplest way: let the phone listen to the radio's (or computer's) speaker. How you hold it makes a big difference:
- Point the bottom edge of the phone (the USB-C end, where the main microphone is) at the speaker. Keep your fingers off the grilles.
- Get close: about 5–15 cm (2–6 in). Up close the phone hears the speaker, not the room's echoes, which smear the picture into streaks and speckle.
- Moderate volume: loud enough that the level meter moves well, but not so loud that the speaker distorts.
- A quiet room. Fans, keyboards and voices all end up in the picture.
Even done well, the air path costs some quality; compare the SNR with a clean decode of the same recording. A cable or Bluetooth connection avoids it altogether.
USB audio interface
Plug a USB audio interface or radio interface into the phone (USB-C, or a Lightning adapter) and choose it under Source. For transmitting, the same interface carries Photon SSTV's audio to the radio's microphone input.
Bluetooth radios
Radios with Bluetooth audio, such as the BTECH UV-PRO, work as a hands-free device. Pair the radio in the iPhone's Settings → Bluetooth first, then choose it under Source. Bluetooth hands-free audio is narrow, but SSTV's tones (1100–2300 Hz) fit comfortably.
SDR software over the network
Photon SSTV can listen to audio streamed over your Wi-Fi from SDR software such as GQRX or SDR++:
- In the SDR program, turn on UDP audio output (GQRX: the UDP button under the audio panel; SDR++: a network sink). Send it to your phone's IP address, port 7355, 48 kHz, mono, 16-bit.
- In Photon SSTV, check Settings → Network audio matches: UDP port, sample rate, mono or stereo.
- Choose Network audio (UDP :7355) under Source. The first time, iOS asks to allow the local network; say yes.
Recordings
Choose Decode an audio file… under Source. WAV, MP3, M4A, FLAC and AIFF all work. You can also drop recordings into the Files app under On My iPhone → Photon SSTV.
4. Straightening a picture
If the sender's and receiver's clocks differ slightly, a picture leans (slant). Photon SSTV measures and corrects this automatically. For anything left over, tap ADJUST after the picture finishes:
- Slant (−2000 to +2000 parts per million) straightens a leaning picture.
- Shift (±50%) slides the picture sideways, when its edge wraps round.
The preview updates as you drag. Apply replaces the picture and its Gallery copy; Reset returns to the original.
5. Gallery
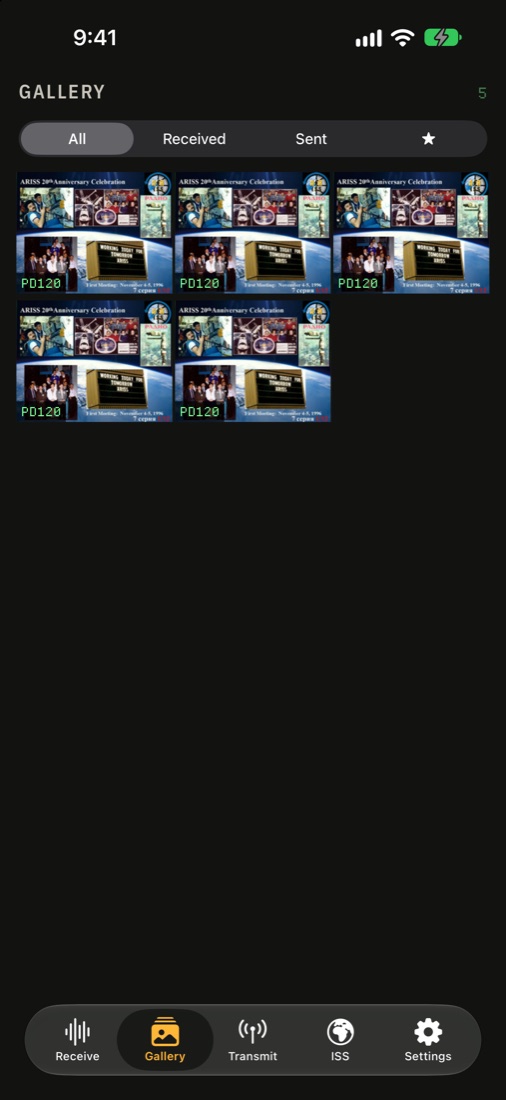
With Save decoded pictures on (Settings → Receive), every picture of at least 16 lines is saved automatically, along with every picture you send.
- Filter with All, Received, Sent or ★ (favourites).
- Tap a picture to see it full size with its details: when it was received or sent, its source, and for received pictures the lines decoded, SNR, clock error and tuning offset.
- From there you can star it, share it or delete it.
- Sent pictures are marked TX.
6. Transmit
- Picture
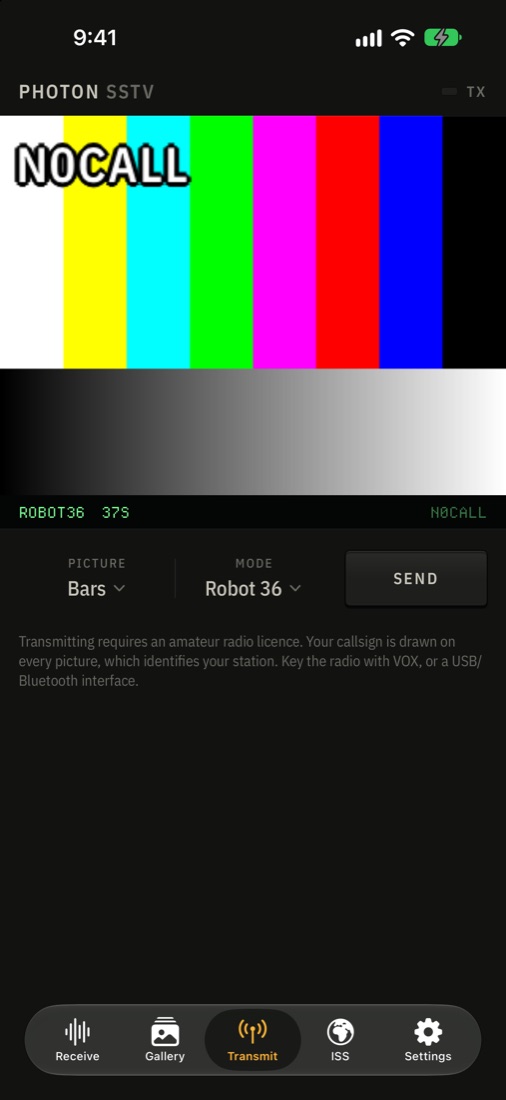
- A Photo… from your library (cropped to fill the mode's picture), or a test card: Bars, White, Black, Ramp or Checker. Message… adds a short line of text at the bottom.
- Mode
- Any of the supported modes, each shown with its airtime. Robot 36 (37 s) is quick and widely received; PD120 is higher resolution.
- Send / Stop
- Plays the picture as audio through the current output: the speaker, a USB interface, or a Bluetooth radio. Receiving stops while you send, and sent pictures go to the Gallery.
- Keying the radio
- Use your radio's VOX, or your interface's PTT. If VOX clips the start, turn on VOX pre-tone in Settings. It sends half a second of 1900 Hz first, so the radio is keyed before the picture begins.
7. The ISS and SSTV
ARISS (Amateur Radio on the International Space Station) runs SSTV events a few times a year. For several days, the ISS repeatedly sends a series of pictures (often 12) that anyone can receive with a handheld radio and a phone. Each event is announced with its dates, frequency and mode. The Upcoming ISS Events link in Settings → ISS opens ARISS's event page.
- Frequency and mode: recent events (2026) use 437.550 MHz FM with Robot 36; earlier ones used 145.800 MHz FM with PD120. Always check the event page.
- Equipment: a 70 cm FM radio (a handheld is fine). A small directional antenna, such as a handheld Yagi, helps a lot, because the ISS is 400–2,000 km away.
- When: the ISS is only above your horizon for about 10 minutes at a time, a few times a day. The ISS tab predicts every pass for your location.
- Doppler: at 437.550 MHz, the ISS's speed shifts the frequency by up to ±10 kHz during a pass, so you step your radio through a few memories as it goes (section 9).
8. The ISS tab
The sky chart
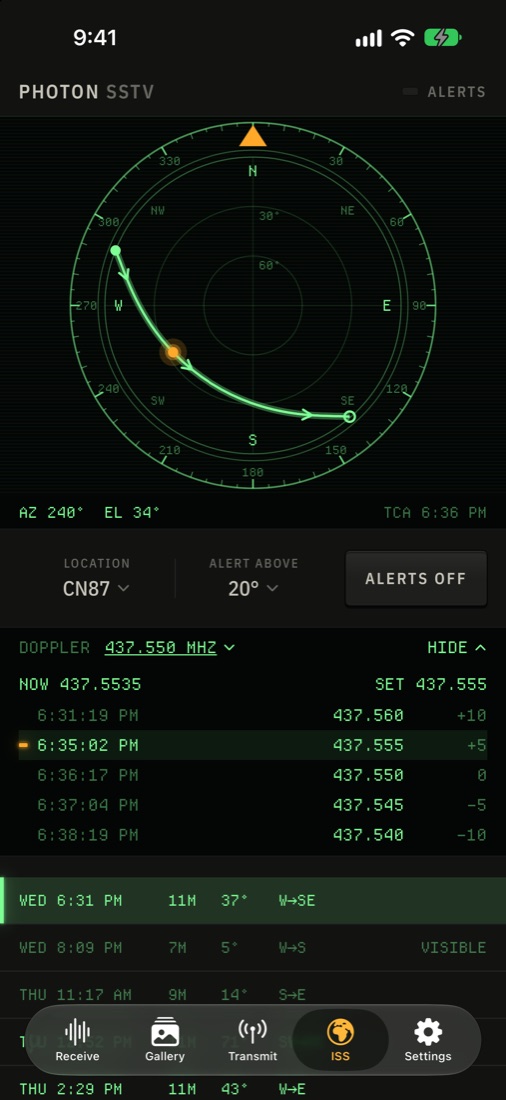
A map of the whole sky above you, as if the phone were lying flat and you looked down on it:
- Direction: north is at the top (the amber pointer), east on the right, south at the bottom, west on the left. The ring around the edge is a compass, with numbers every 30°.
- Height: the outer circle is the horizon; the rings are 30° and 60° up; the centre is straight overhead.
- The pass: the curve is the ISS's path. It rises at the filled dot, sets at the ring, and the arrows show which way it travels. The closer the curve comes to the centre, the higher (and stronger) the pass.
- During a pass: the ISS itself glows amber on the curve.
The line underneath shows the countdown to rise (AOS) and the highest elevation, or during a pass, where to point (AZ bearing, EL height). TCA is the time of the highest point.
Turn on Rotate sky plot with compass in Settings and the chart turns as you turn, keeping the direction you face at the top.
Controls
- Location
- Use my location, or set a grid square in Settings (no location permission needed).
- Alert above
- The lowest peak elevation worth an alert: 10°, 20°, 30° or 45°. Higher passes are stronger and longer.
- Alerts on / Alerts off
- Notifications before each pass that peaks above the threshold, with the lead time you choose in Settings (2–30 min). Turn them on for an event's dates.
The pass list
Every pass in the next 48 hours: when it rises, how long it lasts, its peak elevation, and where it rises and sets. Brighter rows are above your alert threshold. VISIBLE marks passes you could also see with your eyes (the ISS in sunlight while your sky is dark), the same as the ISS Detector app. Radio doesn't need that, so daytime passes work just as well. Tap a pass to show it on the chart. Pull down to refresh the orbit data.
9. Doppler and radio memories
The ISS moves at 7.7 km/s. Approaching, its signal arrives higher than the published frequency; receding, lower. At 437.550 MHz that's up to about ±10 kHz (±3.5 kHz at 145.800 MHz), enough to take an FM radio off the signal. FM radios tune in fixed steps, so the usual method is to store a few memories around the frequency and step through them during the pass.
The Doppler panel (ISS tab)
- The frequency next to DOPPLER is a menu with 437.550 (SSTV events, 2026), 145.800 (VHF), 437.800 (the crossband repeater), and Other frequency… to type any 2 m or 70 cm frequency.
- Radio channel step (same menu): 1, 2.5, 5, 6.25, 10 or 12.5 kHz. Use your radio's step; 5 kHz is common.
- The summary line shows how many memories you need and the largest shift, e.g. 5 MEMORIES · 5 KHZ and ±9.8 KHZ MAX. During a pass: NOW the exact frequency, and SET the memory to be on.
- TABLE opens the full plan for the selected pass: the time of each switch, the memory, and its offset.
Programming your radio
For 437.550 MHz with 5 kHz steps, store these in consecutive memories, so one press takes you to the next:
| Memory | Frequency | Offset | Use |
|---|---|---|---|
| 1 | 437.560 | +10 kHz | At rise (approaching) |
| 2 | 437.555 | +5 kHz | |
| 3 | 437.550 | 0 | Around the highest point |
| 4 | 437.545 | −5 kHz | |
| 5 | 437.540 | −10 kHz | At set (receding) |
Start on the top memory at rise and step down one at a time. Photon SSTV's table tells you exactly when; each switch comes as the shift crosses halfway between two memories. These are the same channels as ARISS's own Doppler sheet. The tracker counts you into each switch.
10. The ISS tracker
Tap Enable ISS tracking under the Listen row on the Receive screen. The tracker shows where the ISS is, which way to point, and when to change memory, while the picture decodes above it. Close turns it off. While it's on, the screen stays awake.
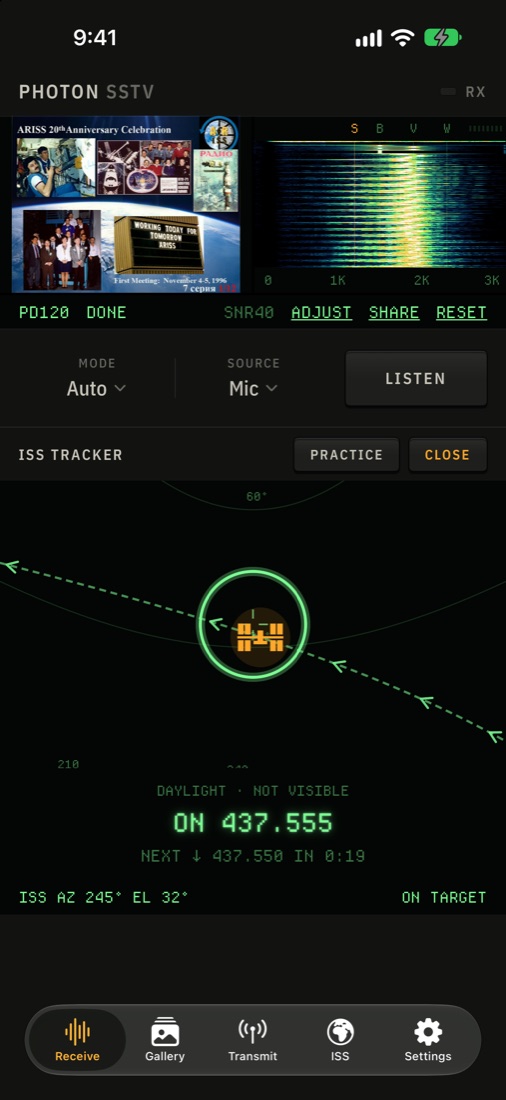
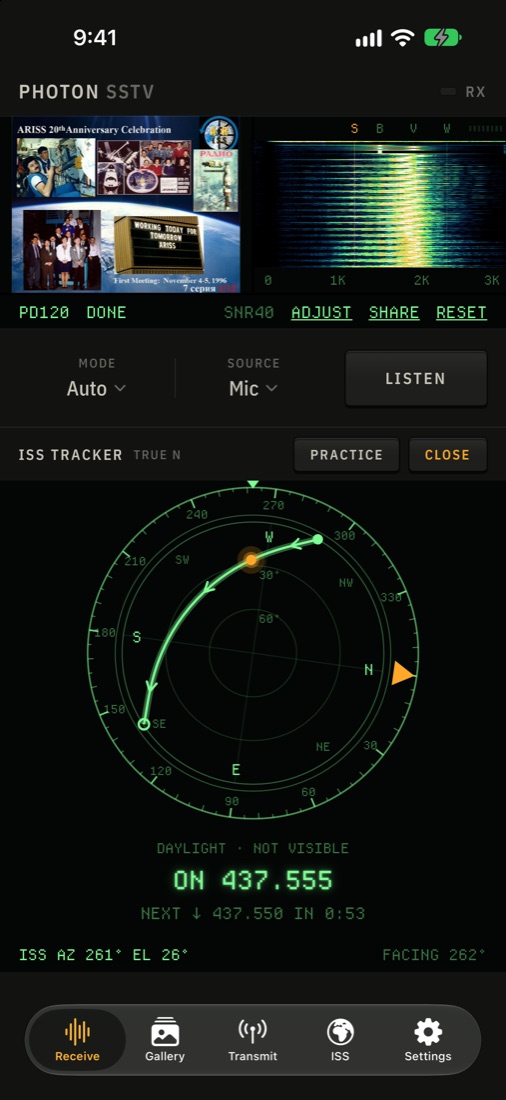
Held upright: the sky view
Hold the phone upright with its back toward the sky, as if taking a photo. It's like standing in the middle of the sky dome:
- The horizon runs across the view with the compass on it: ticks every 5°, numbers above, and N, NE, E… below (N in amber). The amber marker on the horizon is the ISS's bearing.
- Up the dome: faint rings at 30° and 60°, and a ZENITH mark straight overhead.
- The pass is a dashed line with arrows showing its direction. The ISS is drawn on it where it really is, in amber during the pass. Before it, it waits at the rise point, marked RISES.
- The ring in the middle is your aim. Keep the ISS inside it; the ring lights up and the bottom line says ON TARGET. Outside the ring, an amber arrow points the way to turn, and the bottom line spells it out, e.g. → 35° ↑ 12° (turn right 35°, tilt up 12°).
Lying flat: the radar view
Lay the phone down and the tracker becomes a radar: the sky chart, turned with the compass so it lines up with the ground around you, showing the pass and the ISS. The bottom line shows the way the phone faces. Pick it up and the sky view returns.
What to do with the radio
- Can you see it by eye? VISIBLE, DAYLIGHT · NOT VISIBLE or IN SHADOW.
- Before the pass: START ON 437.560 and the countdown to rise.
- During it: ON 437.555 and NEXT ↓ 437.550 IN 0:42.
- In the last three seconds, a big 3 – 2 – 1 flashes in the middle, with a firm tap you can feel each second. Then ↓ 437.550 NOW and CLICK DOWN ONE MEMORY, with a second tap. Your eyes can stay on the sky.
Compass accuracy
The tracker uses the phone's compass, like sky-map apps. The header shows True N, or Magnetic N if location access is off (then it can be off by your local magnetic declination). Stay away from cars, metal railings and the radio itself. If iOS asks, wave the phone in a figure of eight to calibrate. A phone compass is good to within several degrees, which the target ring allows for.
11. Practice passes
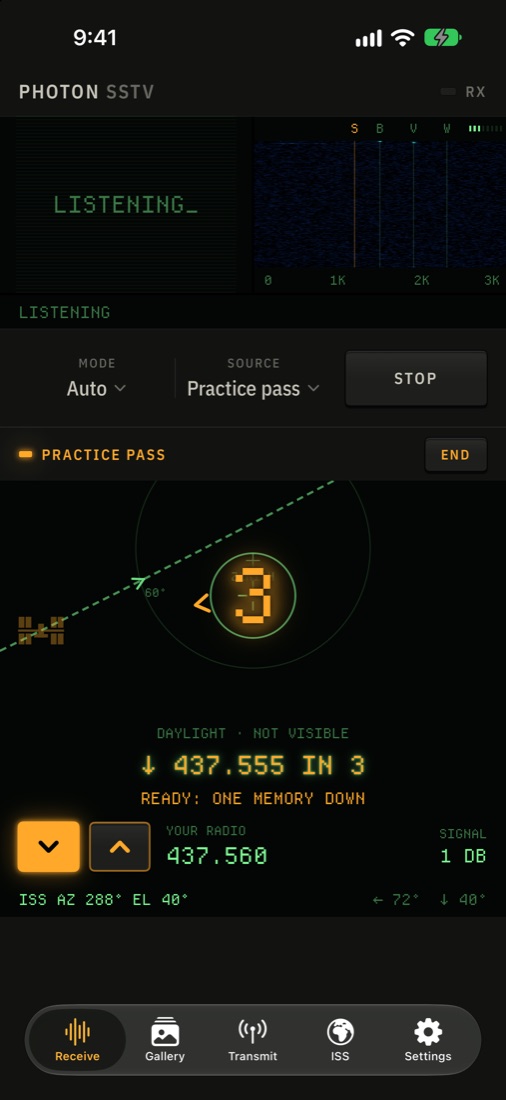
A practice pass is a full rehearsal: pointing, memory switching and decoding, whenever you like. Tap Practice in the tracker's header and choose:
- Quick (about 3 minutes) starts 90 seconds before the highest point. It covers the whole picture and the busiest switching.
- Full (about 10 minutes) runs from rise to set, after a 15-second countdown.
How it works
- The pass is real: the highest upcoming pass over your location, replayed starting now. The path across your sky, its speed and the Doppler timing are exactly what that pass will be. The header reads PRACTICE PASS the whole time.
- The downlink is the ISS sample recording, timed so the picture arrives around the highest point, over the hiss of an open FM squelch. The Receive source shows Practice pass.
- Your radio is on screen: ▼ ▲ on the left step the memory, with YOUR RADIO showing it (amber when it's the wrong one) and SIGNAL in dB. From the 3 – 2 – 1 until you've switched, the key to press lights up and pulses.
What decides the picture
- Distance: strongest overhead, about 15 dB weaker near the horizon.
- Pointing: about 3 dB lost at 15° off target, 12 dB at 30°.
- Tuning: fine within ±2.5 kHz of the memory, then 3 dB worse for every kHz further off. Staying a whole memory behind shows in the picture.
The report
At the end (or when you tap End): how many lines of the picture came through and its SNR, how much of the pass you were on target, and each memory switch, on time (within 4 seconds) or late, early or MISSED. Again repeats the practice; Done closes it. The picture is saved to the Gallery (as Practice pass) if saving is on.
12. Settings
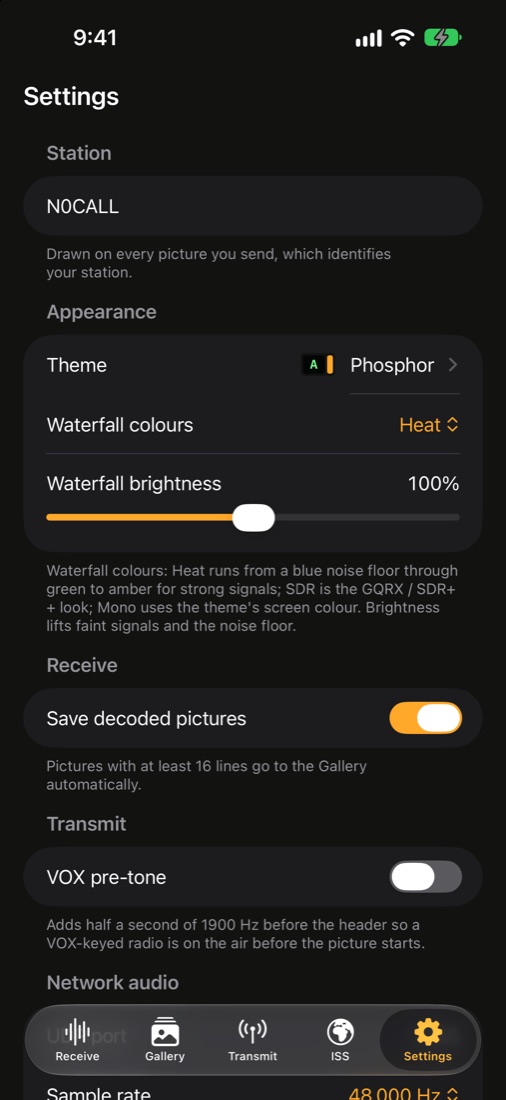
- Station · Callsign
- Drawn on every picture you send.
- Appearance · Theme
- Phosphor (green and amber, the default), Amber CRT, Monokai, Solarized Dark, Catppuccin Mocha, Dracula, Nord, Gruvbox Dark.
- Appearance · Waterfall colours
- Heat (blue noise floor, green and amber for strong signals), SDR (the GQRX / SDR++ look), or Mono (the theme's screen colour).
- Appearance · Waterfall brightness
- 50–200%. Higher brings out faint signals; lower darkens the noise floor.
- Receive · Save decoded pictures
- Saves every picture of at least 16 lines to the Gallery.
- Transmit · VOX pre-tone
- Half a second of 1900 Hz before each picture, to key a VOX radio.
- Network audio
- UDP port (default 7355), sample rate (8,000–48,000 Hz) and channels, matching your SDR software.
- ISS
-
- Upcoming ISS Events opens ARISS's event page.
- Grid square: your Maidenhead locator, e.g. CN87. It's enough for pass times and needs no location permission.
- Alert before a pass: 2, 5, 10, 15 or 30 minutes.
- Rotate sky plot with compass.
- About
- Version, this manual, and the font licences.
13. Background decoding and the Live Activity
- Locked screen: once Photon SSTV is listening, it keeps decoding with the screen locked or while you use other apps. Start listening before you lock the phone; iOS doesn't let an app start the microphone from the background.
- Live Activity: progress shows on the Lock Screen and in the Dynamic Island: listening, then the mode and lines as a picture arrives, then received with its SNR. It stays for 15 minutes after a picture.
- Background refresh: once a day, Photon SSTV refreshes the ISS orbit data in the background and reschedules pass alerts.
14. Tips for good pictures
- Squelch: set the radio's squelch open (off). Squelch cuts out a weak signal mid-picture.
- Volume: about half. The level meter should move without sitting at the top.
- Radio settings: turn off any noise reduction or "voice enhancement" on the radio. Use its wide FM setting if it has one.
- ISS antenna: a small directional antenna makes a big difference. Rotate it about its axis now and then; the signal's polarisation changes during a pass.
- Pass choice: pick high passes (40° and up). Low ones are weaker and often blocked by buildings and trees.
- Doppler: follow the memory switches; the tracker counts you in.
- HF (USB): tune so the tones sit between the BLK and WHT markers with the sync line at SYNC. Photon SSTV corrects small tuning errors itself and shows the offset.
- Through the air: bottom edge of the phone toward the speaker, 5–15 cm away (see Connecting your radio).
- Practice: do a practice pass before an event, and test your audio path with PLAY SAMPLE or by playing a recording near the phone.
15. Troubleshooting
- Nothing decodes
- Check Source is the right input and the level meter moves. Leave Mode on Auto. Try PLAY SAMPLE to confirm the decoder works. If you joined a picture part-way, choose its mode and it will pick up.
- Pictures are scratchy or speckled through the air
- Move the phone's bottom edge (the USB-C end) within 5–15 cm of the speaker, at moderate volume, in a quiet room. Room echo is the usual cause.
- The picture leans or is split sideways
- Tap ADJUST and use Slant or Shift.
- Noisy picture, coloured streaks
- The signal is weak or off frequency. Open the squelch, point the antenna better, and follow the Doppler memories.
- ISS tab says NO LOCATION
- Set a grid square in Settings → ISS, or tap Location → Use my location.
- No passes or no orbit data
- Photon SSTV needs the internet once a day to download the ISS orbit from CelesTrak. Pull down on the ISS tab to retry.
- The tracker points the wrong way
- Calibrate the compass (a figure of eight) and move away from metal. If the header says Magnetic N, allow location access for true north.
- Pass alerts don't arrive
- Check that Alerts on is set on the ISS tab, notifications are allowed for Photon SSTV in the iPhone's Settings, and the pass peaks above your Alert above setting.
- Network audio is silent
- Phone and computer on the same Wi-Fi; the SDR is sending to the phone's address and port; the sample rate and channels match Settings. Allow Local Network for Photon SSTV in the iPhone's Settings.
- My Bluetooth radio isn't listed
- Pair it in the iPhone's Settings → Bluetooth first, then look under Source.
16. Supported modes
Photon SSTV receives and sends all of these. In Auto it recognises each from its VIS header, or from its line timing if the header was missed.
| Mode | Picture | Time | VIS |
|---|---|---|---|
| Robot 36 | 320×240 | 37 s | 8 |
| Robot 72 | 320×240 | 73 s | 12 |
| Martin M1 | 320×256 | 115 s | 44 |
| Martin M2 | 320×256 | 59 s | 40 |
| Scottie S1 | 320×256 | 111 s | 60 |
| Scottie S2 | 320×256 | 72 s | 56 |
| Scottie DX | 320×256 | 270 s | 76 |
| PD50 | 320×256 | 51 s | 93 |
| PD90 | 320×256 | 91 s | 99 |
| PD120 | 640×496 | 127 s | 95 |
| PD160 | 512×400 | 162 s | 98 |
| PD180 | 640×496 | 188 s | 96 |
| PD240 | 640×496 | 249 s | 97 |
17. Glossary
- AOS, TCA, LOS
- Acquisition of signal (the ISS rises), time of closest approach (its highest point), loss of signal (it sets).
- Azimuth (AZ) and elevation (EL)
- Compass bearing (0° north, 90° east…), and height above the horizon (0° horizon, 90° straight up).
- ARISS
- Amateur Radio on the International Space Station, which runs the ISS's SSTV events.
- Doppler shift
- The change in received frequency caused by the ISS moving toward or away from you.
- Grid square
- A Maidenhead locator such as CN87: a compact way hams give their location.
- Memory / channel step
- A stored radio frequency; the fixed spacing your radio tunes in (often 5 kHz).
- Slant
- A picture leaning because the sender's and receiver's clocks differ slightly.
- SNR
- Signal-to-noise ratio in dB: how far the signal stands above the noise.
- TLE
- Two-line element set: the published orbit data Photon SSTV uses to predict passes.
- VIS
- The short header at the start of a transmission that names its mode.
18. Privacy
The full privacy policy is on its own page. In brief:
- No tracking: Photon SSTV has no accounts, no analytics and no ads.
- Location is used only on your phone to predict passes, rounded to about 1 km. A grid square works instead, with no permission.
- The microphone is used only while you're listening. Pictures stay on your phone unless you share them.
- The network: the app downloads the ISS orbit data from CelesTrak (about once a day). Network audio listens on your local network only when you choose it. Links such as Upcoming ISS Events open in Safari.
19. Credits and licences
- Fonts: Departure Mono by Helena Zhang, and IBM Plex Sans Condensed by IBM. Both are used under the SIL Open Font License (Departure Mono licence, IBM Plex licence).
- Pass prediction: the SGP4 orbit model, after Vallado et al., "Revisiting Spacetrack Report #3" (2006). The orbit data is from CelesTrak.
- Sample recording: an ISS SSTV transmission from the ARISS 20th-anniversary series (July 2017).
- Events: event information is from ARISS. Photon SSTV is not affiliated with ARISS, NASA or any space agency.